
Windows developers often need to use Unix-style commands and build software binary executables from source code. There are 3 main tools that let you do this:
- Cygwin
- MSys2
- Windows Subsystems for Linux (WSL)
I switched from Cygwin to MSys2 a few years ago. I like MSys2, but it’s easy to misunderstand what it is doing for you.
MSys2 is a system that gives you 3 different shell environments:
- A system maintenance shell (MSys2)
If you want to install packages or tools, you use this shell.
You don’t use this shell to build software. - A 32-bit GCC build environment (MinGW32)
If you want to build software using 32-bit tools, you launch this shell.
Note: You can compile 64-bit binaries with 32-bit tools - A 64-bit GCC build environment (MinGW64)
If you want to build software using 64-bit tools, you launch this shell.
Note: You can build compile 32-bit binaries with 64-bit tools
This article shows you how to install MSys2 and how to use it for development.
Set up a “Home”
This step is optional, but highly recommended. Many tools that have come from the Unix platform make use of an environment variable called “HOME“. If you set one, then MSys2 will use that directory to store command-line history, your personal settings, etc.
The best place for a HOME directory is on a short directory path with no spaces. I generally put it in “C:\Apps\Home“. If you don’t know how to do this, right click on “My Computer”, choose “Properties”, then follow the steps in the picture below.
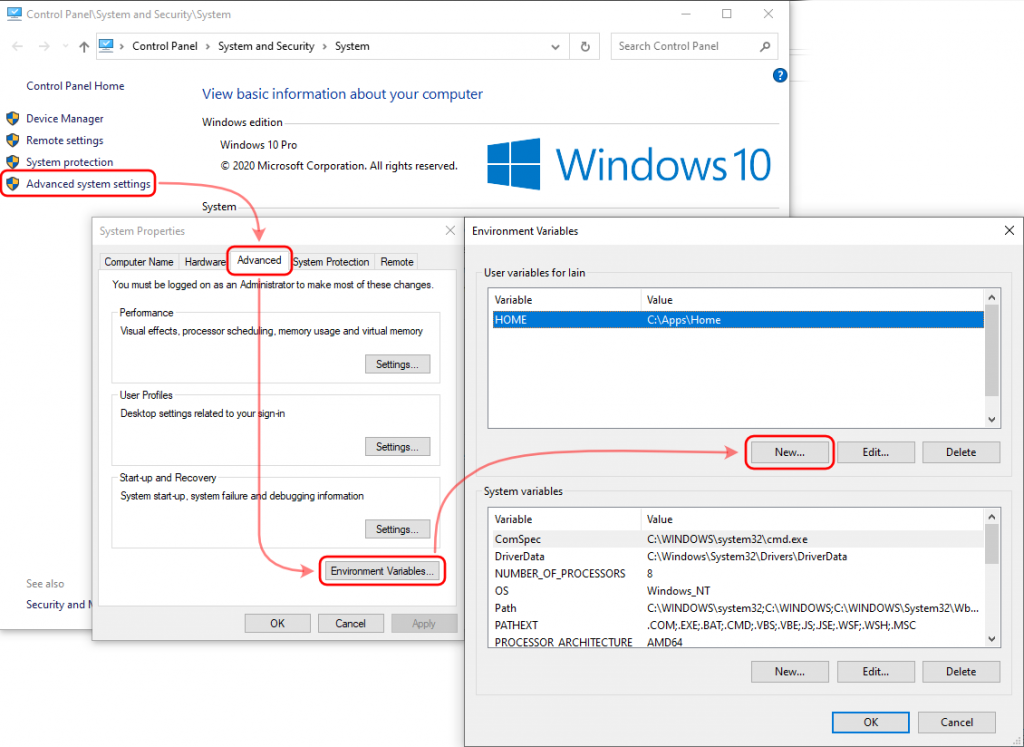
Note: The variable must be an upper-case “HOME”, but the directory I use is “Home”.
Advanced option: I also put this Home directory under Git revision control, so I can track changes to my settings over time.
Installing MSys2 for Development
You can have as many copies of MSys2 on your PC as you like. If I’m trying something potentially risky that may mess up my configuration, I will either create a backup of my installation by making the ‘.zip’ file of the whole thing, or I will make a new installation from scratch. I’ve started from scratch as I write this to make sure that I don’t miss any commands.
Go to the MSys2 Homepage and download the latest installer.
Follow their instructions and install it on a short path which has no spaces in it (i.e. not in “C:\Program Files“). I generally put it in “C:\Apps\MSys2“. Keep following their instructions to update the base system.
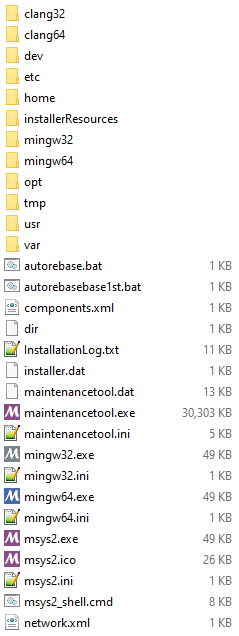
You’ll end up with a directory structure that looks something like this.
Here, you’ve got 3 key executables and 3 key configuration files:
msys2.exeandmsys2.inimingw64.exeandmingw64.inimingw32.exeandmingw32.ini
There aren’t many reasons why you’d want to use the 32-bit toolchain these days, so I create a desktop shortcut to MSys2.exe and MinGW64.exe.
maintenancetool.exe is supposed to help manage MSys2, but I’ve never found a reason to use it.
Install Your First Package
From this point on, we’re going to be typing in MSys2 shell windows; open one now and you should get a black window with a command prompt. If you set a HOME variable earlier, the prompt starts from there.
The most common next step is to install some packages. MSys2 uses the same package manager as Arch Linux; it’s called pacman. The most basic package you probably want to install is called “base-devel” and you install it by typing “pacman -S base-devel“. It gives you these general-purpose essentials:
$ pacman -S base-devel
:: There are 58 members in group base-devel:
:: Repository msys
   1) asciidoc  2) autoconf  3) autoconf2.13  4) autogen
   5) automake-wrapper  6) automake1.10  7) automake1.11  8) automake1.12
   9) automake1.13  10) automake1.14  11) automake1.15  12) automake1.16
   13) automake1.6  14) automake1.7  15) automake1.8  16) automake1.9
   17) bison  18) btyacc  19) diffstat  20) diffutils  21) dos2unix
   22) file  23) flex  24) gawk  25) gdb  26) gettext  27) gettext-devel
   28) gperf  29) grep  30) groff  31) help2man  32) intltool  33) lemon
   34) libtool  35) libunrar  36) libunrar-devel  37) m4  38) make
   39) man-db  40) pacman  41) pactoys-git  42) patch  43) patchutils
   44) perl  45) pkg-config  46) pkgfile  47) quilt  48) rcs  49) reflex
   50) scons  51) sed  52) swig  53) texinfo  54) texinfo-tex  55) ttyrec
   56) unrar  57) wget  58) xmlto

Enter a selection (default=all):
Press “Enter” to choose all packages, then “Enter” again when you are prompted to “Proceed with installation”. Typing “pacman -S <package name>” is how you add new packages to MSys2.
There’s one key point to understand before you go wild and start typing something like “pacman -S gcc“. You’ve got 3 environments and if you’re compiling software, you probably don’t want to mix them up and install the wrong tools.
Do not type “pacman -S gcc“; read on just a little more…
Finding Packages
The next thing to learn is how to find out the name of the package you want to install with pacman. If you don’t install base-devel, there’s only one way:
pacman -Fs <name>
It’s OK, but I really like using the pacman helper tool which comes with base-devel. It’s called pacboy and it’s much more user-friendly.
pacboy find <name>
Understanding The 3 Environments
Open 3 shell windows: MSys2, MinGW64 and MinGW32.
In each one, type “echo $PATH“. I’ve copied the 3 outputs below and highlighted the differences:
MSys2
$ echo $PATH

/usr/local/bin:
/usr/bin:/bin:
/opt/bin:
/c/Windows/System32:
/c/Windows:
/c/Windows/System32/Wbem:
/c/Windows/System32/WindowsPowerShell/v1.0/:
/usr/bin/site_perl:
/usr/bin/vendor_perl:
/usr/bin/core_perl
MinGW64
$ echo $PATH
/mingw64/bin:
/usr/local/bin:
/usr/bin:/bin:

/c/Windows/System32:
/c/Windows:
/c/Windows/System32/Wbem:
/c/Windows/System32/WindowsPowerShell/v1.0/:
/usr/bin/site_perl:
/usr/bin/vendor_perl:
/usr/bin/core_perl
MinGW32
$ echo $PATH
/mingw32/bin:
/usr/local/bin:
/usr/bin:/bin:

/c/Windows/System32:
/c/Windows:
/c/Windows/System32/Wbem:
/c/Windows/System32/WindowsPowerShell/v1.0/:
/usr/bin/site_perl:
/usr/bin/vendor_perl:
/usr/bin/core_perl
If you want to install a 64-bit version of the GCC toolchain, you want it to be placed in /mingw64/bin. How do you do that..? Type “pacboy find gcc” and you get something like this:
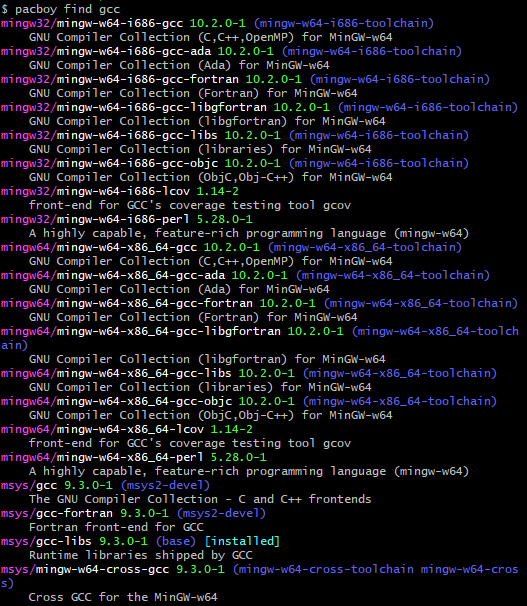
(Thanks to “pacboy” for the coloured output.)
That’s a lot of possible choices! They are:
- Which of the 3 environments is it for?
- Package name
- Version
- It’s part of this meta-package
You’re looking for 64-bit tools, so scan through the pink-coloured sections and only look at the mingw64/ ones. The gcc we want is the first one in the mingw64 section, but wait; it’s also part of a meta-package (a group of common tools), called “mingw64-w64-x86_64-toolchain“. Maybe we want that, so take a look.
$ pacman -S mingw-w64-x86_64-toolchain
:: There are 17 members in group mingw-w64-x86_64-toolchain:
:: Repository mingw64
   1) mingw-w64-x86_64-binutils  2) mingw-w64-x86_64-crt-git
   3) mingw-w64-x86_64-gcc  4) mingw-w64-x86_64-gcc-ada
   5) mingw-w64-x86_64-gcc-fortran
   6) mingw-w64-x86_64-gcc-libgfortran
   7) mingw-w64-x86_64-gcc-libs  8) mingw-w64-x86_64-gcc-objc
   9) mingw-w64-x86_64-gdb  10) mingw-w64-x86_64-headers-git
   11) mingw-w64-x86_64-libmangle-git
   12) mingw-w64-x86_64-libwinpthread-git
   13) mingw-w64-x86_64-make  14) mingw-w64-x86_64-pkg-config
   15) mingw-w64-x86_64-tools-git
   16) mingw-w64-x86_64-winpthreads-git
   17) mingw-w64-x86_64-winstorecompat-git

Enter a selection (default=all):
If you press “Enter”, you get a list of all the packages that are used, as well as their dependencies. It’s worth noting that a 64-bit Python installation is a dependency, so you get this, too.
Before installing “mingw-w64-x86_64-toolchain“, the environments are all the same:
MSys2
$ which gcc
which: no gcc in...

$ which make
/usr/bin/make

$ which python
/usr/bin/python
MinGW64
$ which gcc
which: no gcc in...

$ which make
/usr/bin/make

$ which python
/usr/bin/python
MinGW32
$ which gcc
which: no gcc in...

$ which make
/usr/bin/make

$ which python
/usr/bin/python
After installing “mingw-w64-x86_64-toolchain“, MinGW64 is different:
MSys2
$ which gcc
which: no gcc in...

$ which make
/usr/bin/make

$ which python
/usr/bin/python
MinGW64
$ which gcc
/mingw64/bin/gcc

$ which make
/usr/bin/make

$ which python
/mingw64/bin/python
MinGW32
$ which gcc
which: no gcc in...

$ which make
/usr/bin/make

$ which python
/usr/bin/python
The way that MSys2 uses different paths for the tools it provides is the reason why it behaves this way. MinGW64 looks through the “/mingw64/bin” directory before “/usr/bin“, so it finds “gcc” and “python” there, even if there is also a 32-bit “gcc” or MSys2 “python” available.
In my daily routine, I have an MSys2 shell open to do Unix-stuff, but if I ever want to compile software, I will only use a MinGW64 shell.
You may have Windows tools or libraries that you want to have on the executable path so MinGW64 can see them. You can let MinGW64 or MSys2 see those paths by editing “mingw64.ini” or “msys2.ini” in the MSys2 install directory. Uncomment the line that reads:
MSYS2_PATH_TYPE=inherit
You can check it works by opening an MSys2 shell and typing “echo $PATH“. You should see your standard Windows system paths listed.
If you’ve reached this point, you now have a similar command-line experience as if you were using Arch Linux.
Extend MSys2 Commands to cmd.exe
A last, but very, very useful extra step is to add the Msys “bin” path to your Windows search path. This will let you open a “cmd.exe” window and type commands like “which” or “make” and have Windows find them. It also lets Windows programs use these commands, which is very handy if you’re using “make” in Emacs.
Open the environment variables, as shown back at the start of this article, and add a line to the PATH variable which points to the “bin” directory of your MSys2 installation.